About shaders
For most game developers, shaders are this scary monster that presents itself with such a complexity that it seems out of reach. In reality, shaders are quite simple by default and just get more complex the more you add to them.
To explain the idea of how shaders work, let’s consider a very simple shader for drawing a sprite to the screen. Our sprite is 32x32 pixels in size, and it must be drawn at some position. (Disclaimer: This is not intended as a tutorial but just to give you an idea about how things work if you don’t).
The following OpenGL code sends the sprite to the shader for drawing:
OpenGL Commands
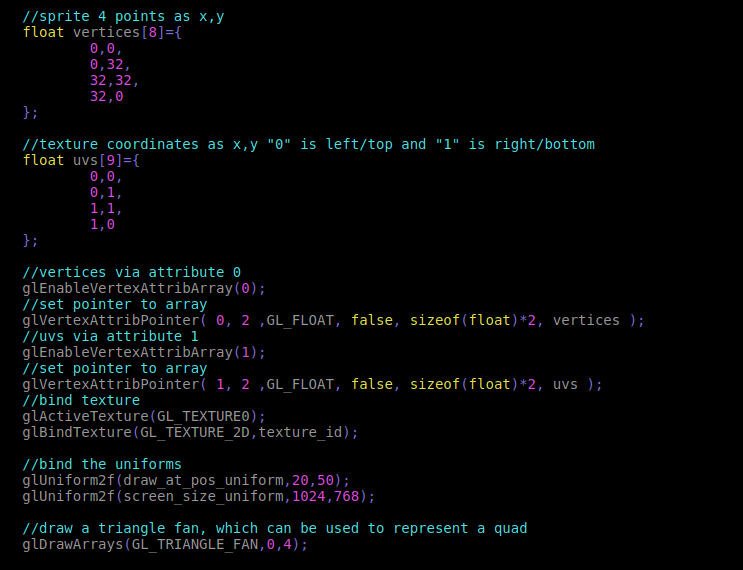
As you can see:
- Vertices / UVs are sent via attributes.
- Configuration parameters are sent via uniforms.
- Textures are simply bound to bind points starting from 0, and the bind point number is sent via attributes too.
After calling glDrawArrays, the vertex program (also called vertex shader in DirectX terminology) is executed once per vertex (we are sending 4 vertices). Each vertex is a pair of floats (we configured this via glVertexAttribPointer()).
Vertex Program
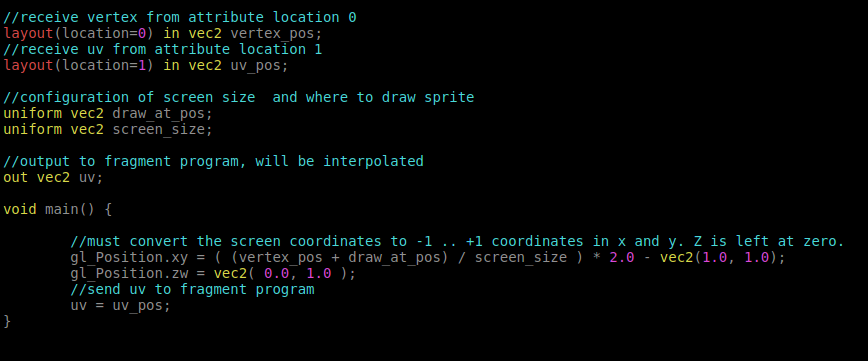
This code no longer runs in the CPU, in fact it runs on the GPU! Again, it is executed per vertex. The output of the vertex program must fit in a “box” of size -1 to +1 in X, Y and Z. The vertices become primitives (in this case, a triangle fan, two triangles that are drawn as a quad) and any primitive that goes beyond the -1 to +1 range is clipped. As such, this is called “Clip Space”.
All we need to know is that we must convert the screen coordinates (for a screen size of 1024x768) to this space, so the natural way of doing this is:
- Divide the final coordinate by the screen size
- Multiply by 2
- Substract (1, 1)
- Result is the sprite vertices in the -1 to +1 clip space coordinates.
These triangles are then drawn to the screen (remember, again the screen can be of any size, but OpenGL will respresent it in the -1 .. +1 range for drawing).
For each pixel drawn to the screen, OpenGL will interpolate the outputs that were generated from the vertex program and use them to fill the triangle. In this case, the UV coordinate (for reading the texture). This process is done in the fragment program (pixel shader in DirectX terminology).
Fragment Program
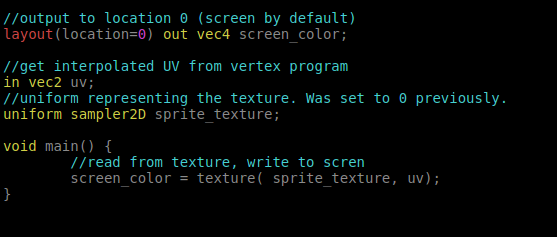
In the fragment program, the input is the UV coordinate (interpolated), and the output the screen color. We use the sprite texture uniform to read the sprite pixels.
As you can see it’s not really that complex.
Shaders in Godot
Of course, if you are working on a game there is a lot more things going on. Vertices have to be transformed in 3D space, and there are many features the engine provides for you such as:
- Taking care of normals, tangent arrays, etc.
- Transforming geometry by skeletons
- Performing lighting, normalmapping, shadowmapping
- Properly drawing the shader in base and additive passes of forward rendering, deferred, shadow, etc. (many configurations)
This gets quite messy. Don’t believe me? This is how long Godot’s default 3D shader for GLES 2.0 is:

It’s about 1300 lines of code, you can read all of it here.
Truth is, however, that far most of the times a programmer wants to write a shader, it only intends to change a few parameters such as how the texture is drawn, changing colors, material properties, etc. Because of this, Godot comes with a simplified shader language (very loosely based on OpenGL ES 2.0 shading language). Users can write the vertex, fragment and lighting shader using a lot of pre-existing information.
As an example, to draw a sprite with a texture in Godot, only this is required:
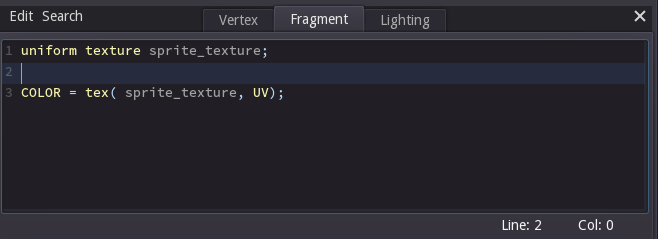
Just that, and Godot takes care of the sprite transform, applying light and shadows to it, sending vertices, etc. It’s much, much simpler and the reason people use game engines in the first place :).
Why not GLSL, HLSL, CG?
A question that comes up often is why did Godot choose not use an existing shader language. There are a few very clear reasons regarding why we went the current way:
- We wanted the shaders to be easy to write. Removing GLSL stuff such as attributes, color buffer management, etc. (which Godot already takes care of) makes the language more coherent.
- We wanted complete control over the code generation. Other game engines force you to write shaders yourself for different rendering passes (such as deferred, forward base, forward addition, shadow, pre-z pass, etc). In Godot, the shader is written only once and the different versions of code are generated on the fly from the parse tree, transparently.
- We don’t want users specifying how the shader must be drawn (e.g. render queue position, render type such as alpha or opaque, etc.). Godot detects if certain variables are written to e.g. alpha and does the queue and render pass management automatically.
The result of this is that shaders always work as intended, with no surprises.
Shaders in Godot 3.0
A lot of developers, however, complained about the Godot shader syntax being too limited. As a result, for Godot 3.0 we did the following changes:
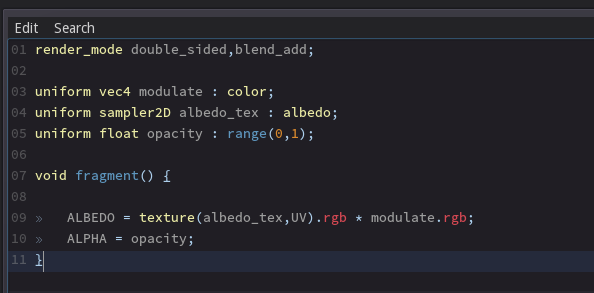
- The language now supports most of the GLSL 3.0 shader specification, and uses OpenGL datatypes and functions.
- Shaders are now a single file, so they can be saved to text to the filesystem.
- Shaders will also now provide hints, so the exported parameters are easier to edit.
- The shader editor provides full code completion and argument hinting, making writing them a breeze!
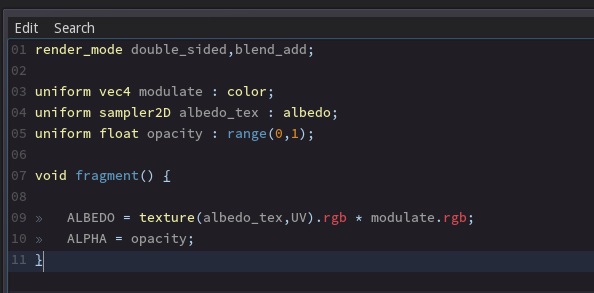
Here is an example of how it looks:
Stay tuned for more!
