The following post is a guest article by Michael Bridges of GameDev.tv, where he runs the Blender course among other things. He is collaborating with Yann Burrett and Ben Tristem on their upcoming Godot course on Udemy, and offered to share a tutorial on how to import 3D assets from Blender using Godot’s “Better” Collada exporter.
Importing 3D assets
So you want to import 3D assets into Godot?
Let’s do it! In this mega guide, we’ll be importing models, their materials, textures AND animations. We’ll be using 2 free amazing open source packages - Blender and Godot.
What 3D formats does Godot support, I hear you ask. It supports:
- DAE (Collada)
- glTF 2.0
- OBJ
In this guide, we will focus on .dae as it is fully supported and
the most mature format.
You might be wondering, where is FBX importing? Unfortunately FBX is a proprietary format owned by Autodesk and not something available to us with Godot. No problem, .dae will do the trick.
Blender, Maya and 3DS Max all have built in Collada exporting but unfortunately it’s broken for our purposes. For Maya and 3DS Max you can use OpenCollada plugins.
Setting up the Better Collada exporter
To get everything exported correctly (including all your animation states), you’ll need a nifty add-on.
First you need Godot Engine’s “Better” Collada exporter for Blender. Once you have installed that you’re good to go.
Here are the steps for doing this. Check out the nifty screenshots below for some visuals.
- Click on Clone or Download
- Download the Zip - Once downloaded make sure you unzip the file!
If you know about source control feel free to clone the repo.

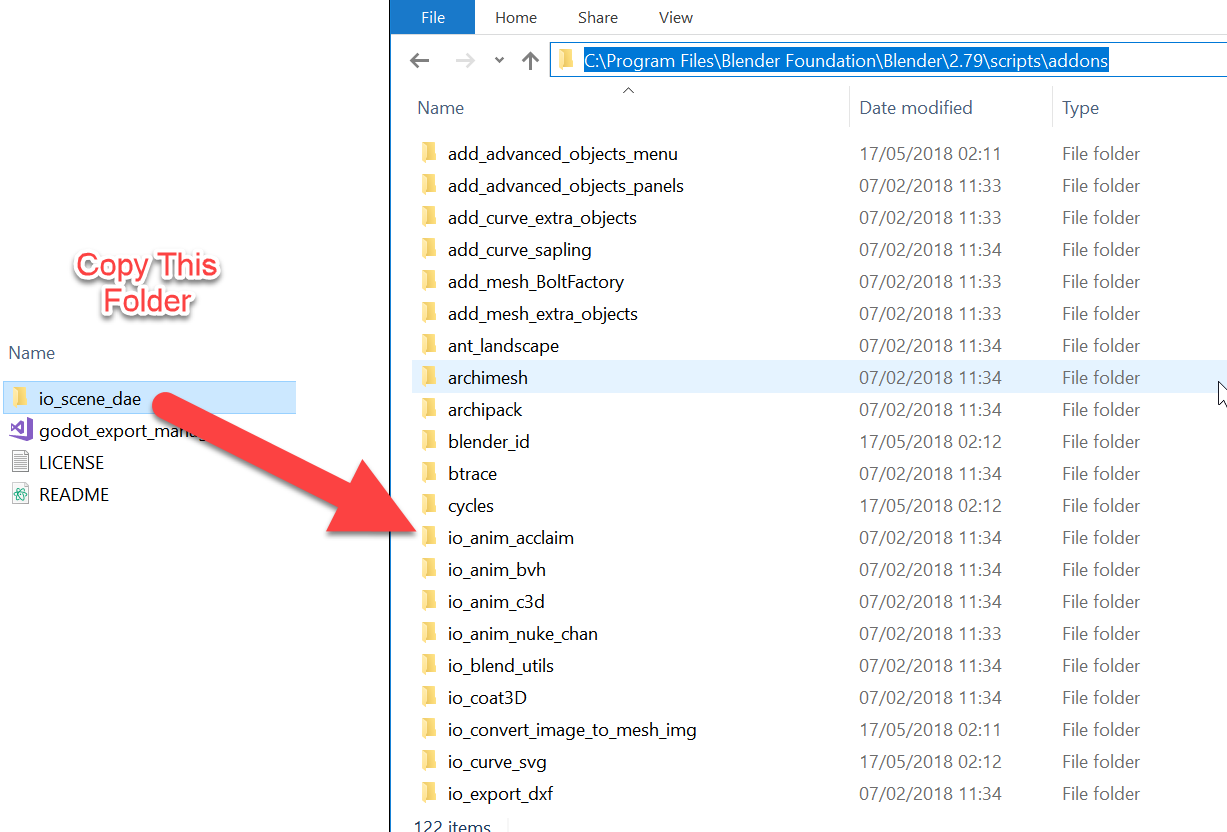
Next comes a bit of copying. You’ll need to get the io_scene_dae
folder into your Blender scripts folder.
On a Windows computer that is typically found here: C:\Program
Files\Blender Foundation\Blender\2.79\scripts\addons.
If you have a different version of Blender installed (you can see I have 2.79) then make sure you adjust your location accordingly.
* Be sure to copy the entire folder and not just the contents of it.
On a Mac it’s slightly different. You will need to navigate to your Applications, open the Blender folder, Right click (secondary click) on the Blender application and Show Package Contents.
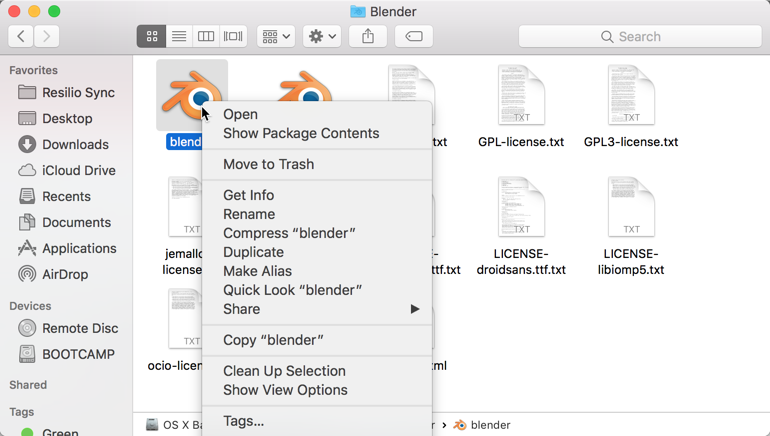
Next you have a little bit of clicking to get to the right place: Contents > Resources > 2.79 > scripts > addons

If you have installed Blender in a custom directory, or are running a portable version, you’ll need to modify the directory you are using accordingly.
With that done open Blender and install the Add-On.
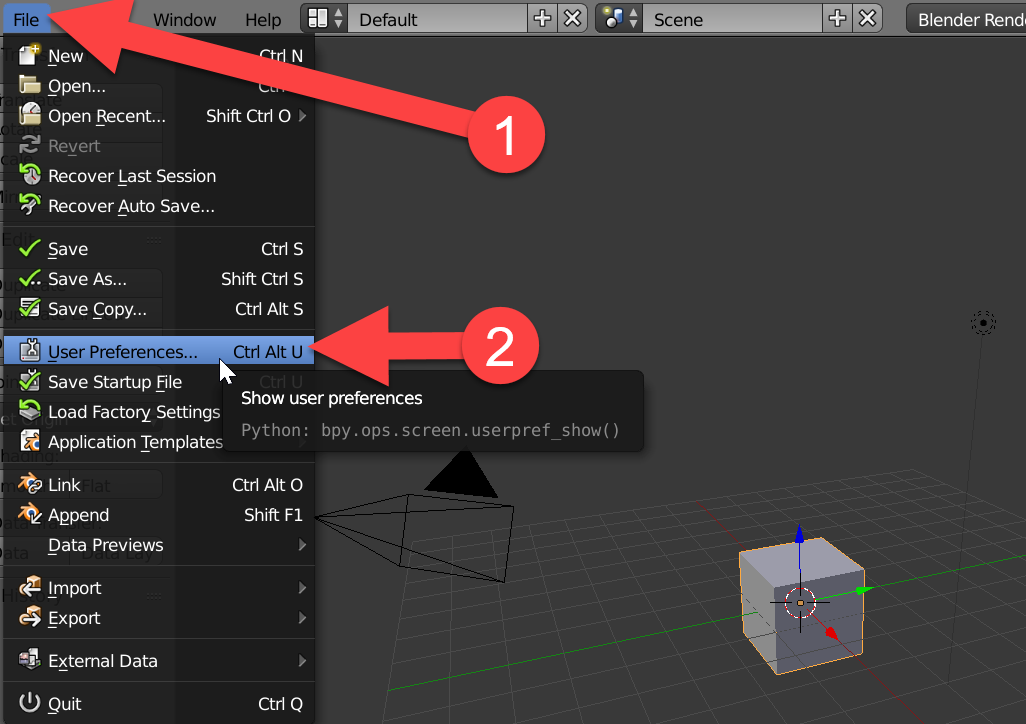
- Goto File
- User Preferences
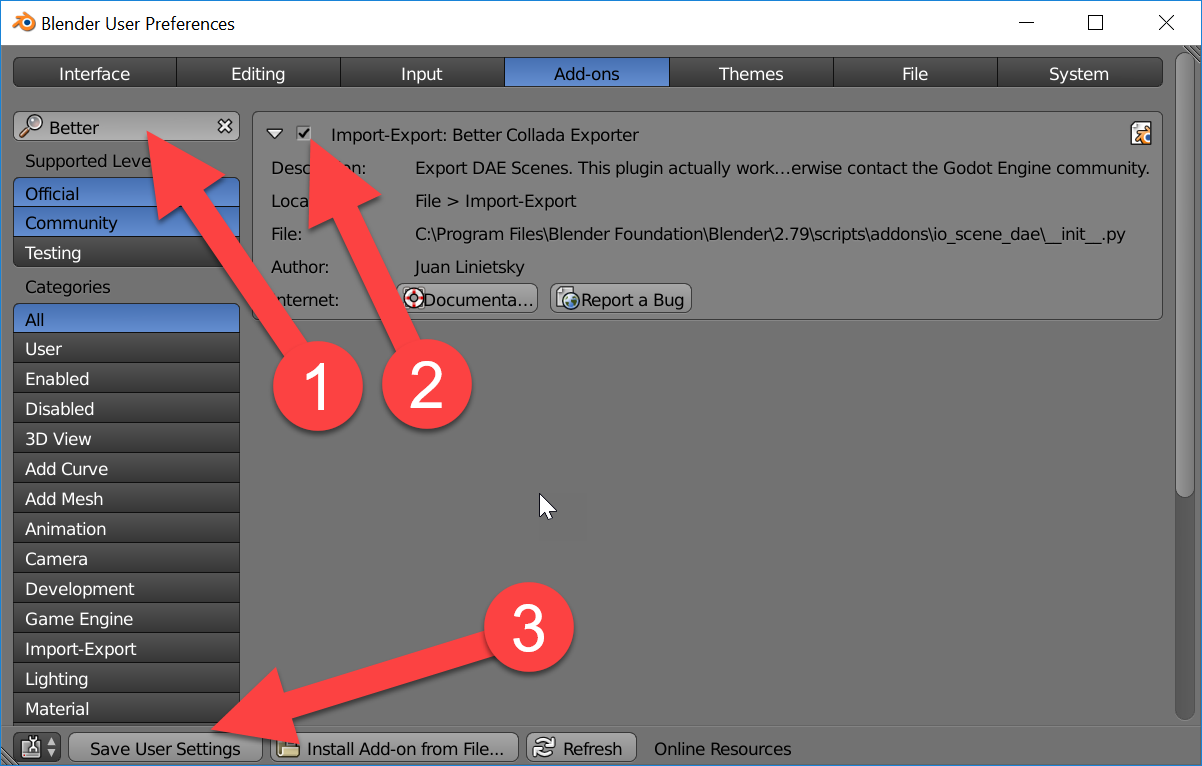
In the User Preferences window:
- I find it easier to search for the addon. I have searched for “Better” in this instance
- Make sure you put a tick to activate the plug in
- Saving your user settings will mean all Blender files will have this enabled. (This is optional)
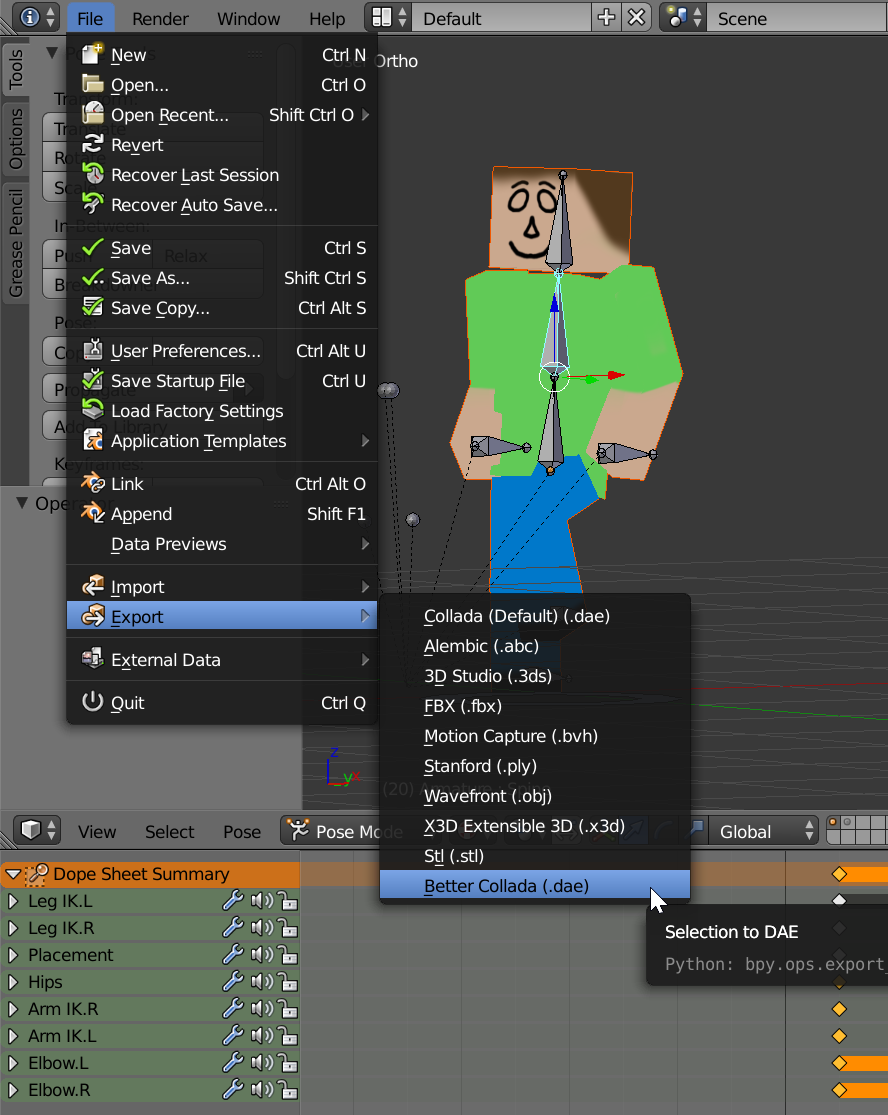
Finally we need to test that it is working:
File > Export Better Collada (.dae) should now be an option available to you.
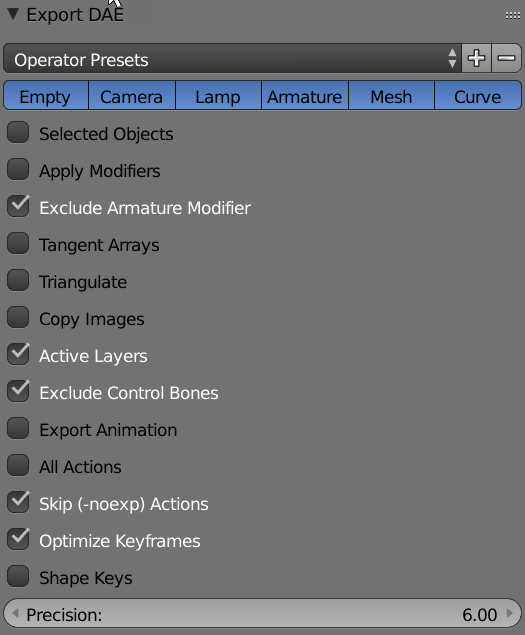
What export settings to use?
There are loads to selected from, but what do they all do?
Let’s start from the top:

Operator Preset, isn’t populated by default, but you can make your own presets once you understand what the project you are working on actually needs.
The next row shows the type of Blender object that will be exported, these aren’t usually desirable to have in your scene but Godot knows how to use most of them which is great
For example If you already have a scene setup including lighting, it will be imported
Next there is a big long list of options:
Selected Objects
As the name implies if and object is not selected it will be left out of the export. This is great if you want to export a particular object or group of objects from a scene.
Apply Modifiers
I would leave this off by default, you wouldn’t necessarily want a subdivision surface being applied creating a mass of geometric data to export and import. Use if you have a specific reason to use it.
Exclude Armature Modifier
It is on by default. If it were not selected and you used **Apply Modifiers **(above) this would ruin your export. I would recommend leaving this checked unless you have a really good reason to un-check it.
Tangent Arrays
This will export tangent and binormal arrays for normal mapping.If you are creating your textures in Blender it is likely that you will leave this off too as you will be providing the normal map required for Godot.
Triangulate
Another one of those ones that sounds simple. In this case I will leave it off as well. Godot supports it and if there were any need to triangulate I would rather it be done explicitly in Blender itself rather than letting the export feature do it randomly.
Copy Images
Along with your .dae file this will provide you with a folder of all the images used. This is super handy when your models and textures have a one to one mapping.
However, I would turn this off if your models share texture sheets or an atlas, otherwise you will have duplicate files and will have a confusing workflow.
Active Layers
Like Selected Objects, this will export everything on a particular layer. Example: If you have lighting on a separate layer, you can toggle that layer off in Blender for export if you don’t want it exporting.
Exclude Control Bones
This will exclude bones with a ctrl prefix or any bone that is not
marked as a deform bone.
Export Animation
This will export the entire animation timeline.
All Actions
This will export any actions that you have setup. This is my prefered way of setting up multiple actions for a model as each animation is self contained.
Skip (-noexp) Actions
If an action ends with -noexp the exported will not export these.
This is useful if you are prototyping certain actions or control
actions.
Optimize Keyframes
Removes double keyframes.
Shape Keys
If you have used shape keys in your animation, you will want this enabled.
Precision
Determines the tolerance when comparing “Double Keyframes”. Higher values are more accurate.
Once you have selected the appropriate selections you can name your file and Export.
An example export
Meet CubeDude, he is going to be our subject for our export. You can download its .blend file or follow the steps with your own Blender model.
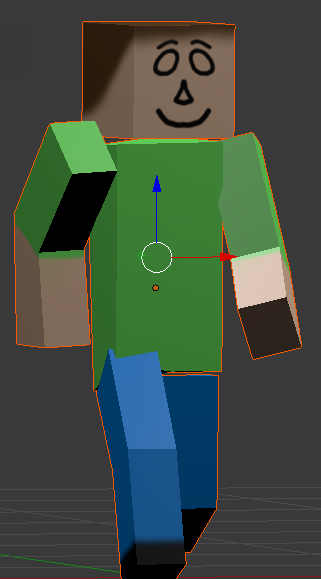
He has the following attributes that we’ll need to consider:
- He is UV unwrapped with a simple material with a single diffuse texture applied.
- Has a bone based rig
- Is animated, with 3 actions
- Has no mesh modifiers
- Does use an armature modifier
- The armature and mesh objects are on Layer 1
- The lighting and camera are on Layer 2
- My control bones are on Layer 20
The scene has lighting and a camera already setup so we can import those as well to make our scene quicker to set up.
Here is my export setup:
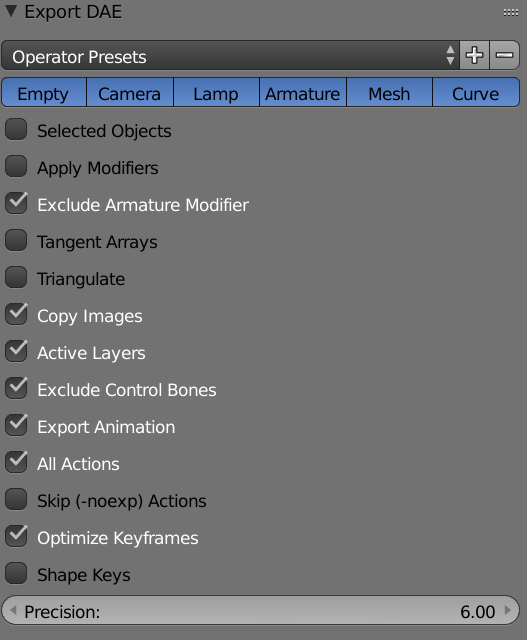
- I only have what I need in this scene so as far as exported object go- I will leave it as default.
- Selected Objects - Doesn’t apply in this scene as I have a simple scene and its organised by layers.
- Apply Modifiers - No modifiers are in my scene, except the armature modifier.
- Exclude Armature Modifier - Left excluding the armature modifier ticked for safety.
- Tangent Arrays - Are unnecessary here.
- Triangulate - Is unnecessary here.
- Copy Images - I will use this as it will place the texture in a folder I can use.
- Active Layers - Yes I have made sure Layer 1 and 2 are active for the export and layer 20 off.
- Excluding Control Bones - Whilst none are prefixed with `ctrl` having this one will catch any non deforming bones.
- Export Animation - Definitely need this checked otherwise we won’t have any animation.
- All Actions - If this is not ticked whichever action was active during the export would be the only one that would be exported. I want all 3.
- Skip (-noexp) Actions - This is off as I haven’t made this animation with this suffix in mind.
- Optimize Keyframes - On by default.
- Shape Keys - Off as not used.
- Precision - Left as default.
Importing Your File In Godot
After export will see that you have a .dae file and an images folder in the location where you exported to.

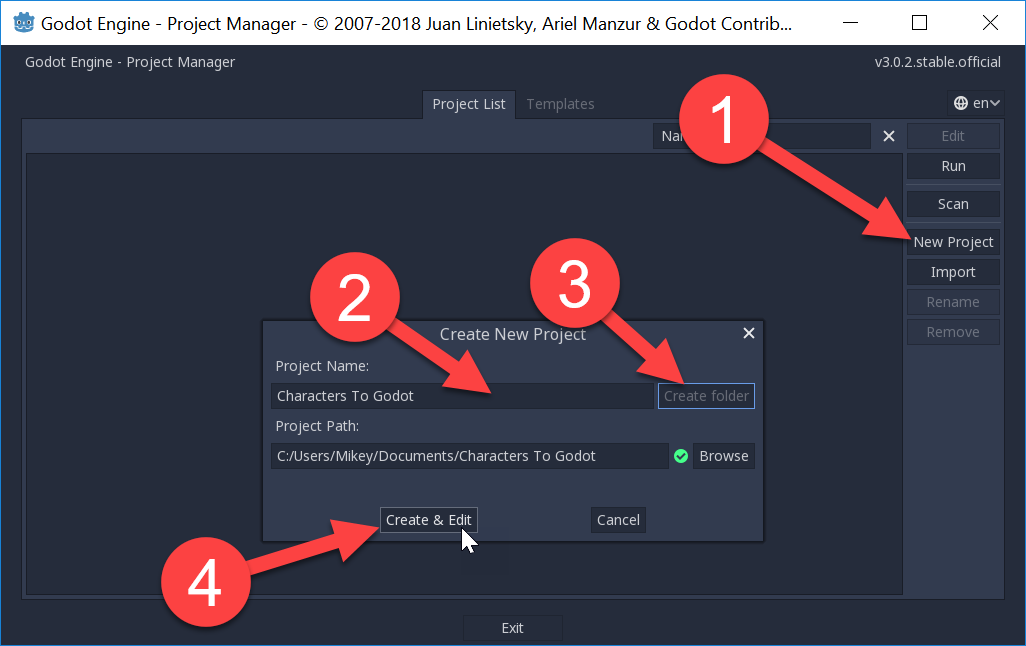
Let’s open up Godot and make sure everything works. I am going to do this in a new project:
- Click on New Project
- Type in the Name of your project
- Click Create folder
- Click Create & Edit
You can get your files into Godot in a few different ways, but since clicking and dragging folders doesn’t import them I have placed my CubeDude folder into my project folder and Godot has automatically added them to this project.
In general once the data is in Godot I would manage everything going forward in Godot itself.
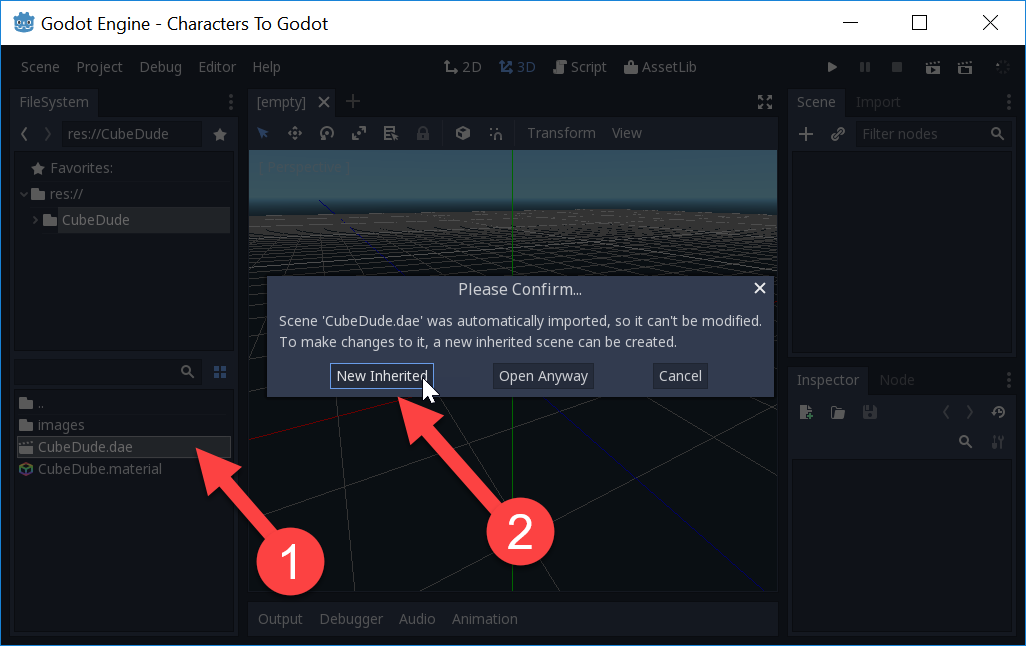
Next let’s get our file imported quickly for testing.
- Double click on the .dae file
- Select New Inherited
Hooray! We now have our asset into Godot and the supporting assets of a camera and lighting (if we needed them).
But wait! He doesn’t look right! Where are his materials and textures!?!
This is a surprisingly common question, not just for Godot but for most 3D exporting and importing from one program to another especially game engines.
Each different 3D package has its own unique material pipeline. Which means there is no direct translation of one material setup in one program to another program. However there is fortunately some standardisation, so at least we can reconstruct a material relatively quickly.
In our case here we need to attach the material to our mesh instance:
- Select the mesh instance
- Directly below in the Inspector tab, click on the dropdown for the Material
- Drag the material into the material slot, now this can be tricky as you have to be pretty precise with the click and drag!
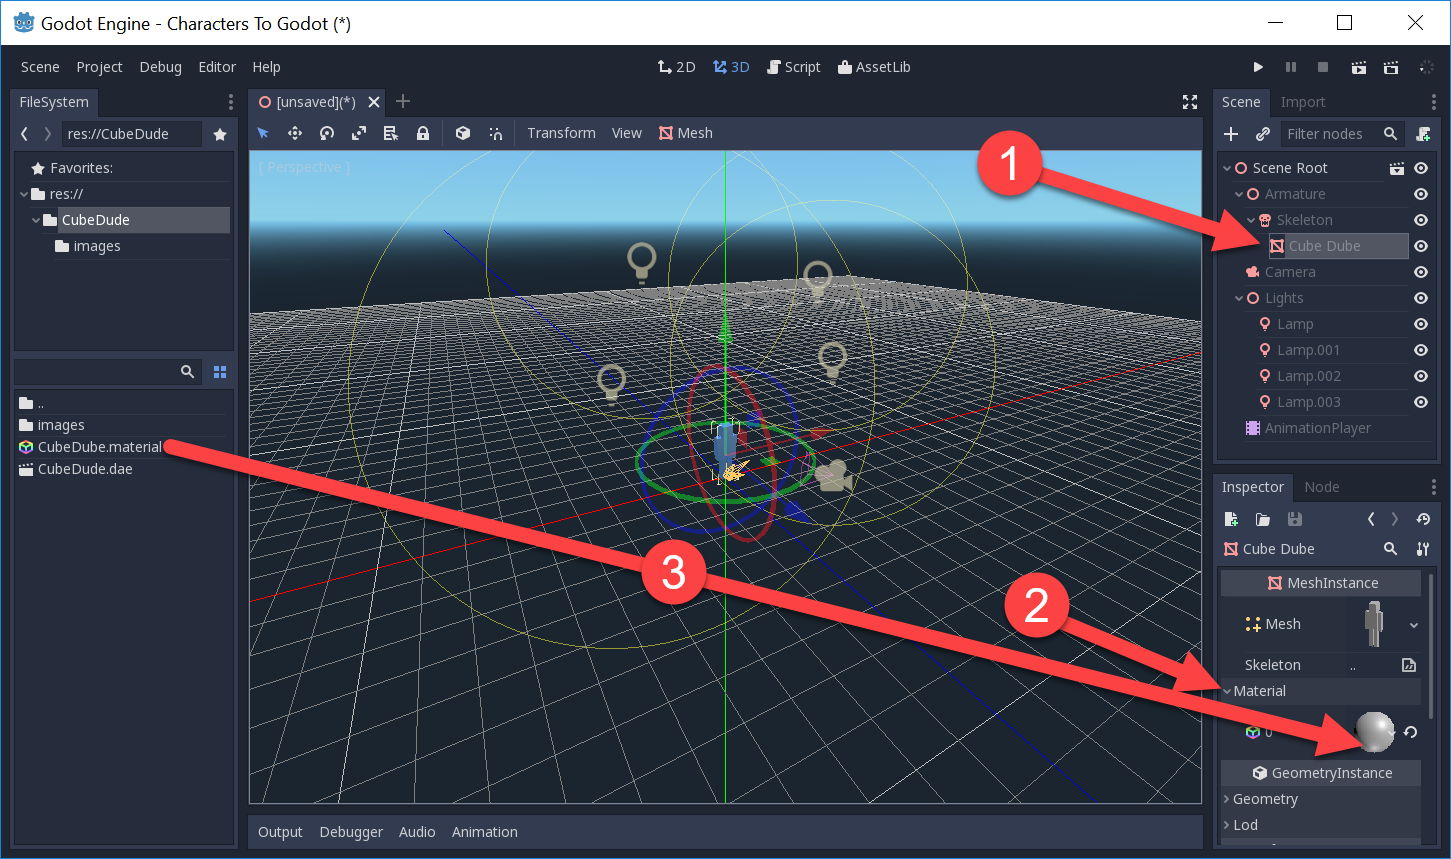
You’ll notice that the model still lacks its colours, that’s because the material currently doesn’t have the texture assigned to it.
So in a similar fashion to how we assigned the material to the mesh instance let’s now assign the image texture to the material:
- Double click the material you want to edit
- In the inspector on the right, click on the Albedo dropdown
- Drag an image into the texture slot. Again this is a precise movement so take it slow.
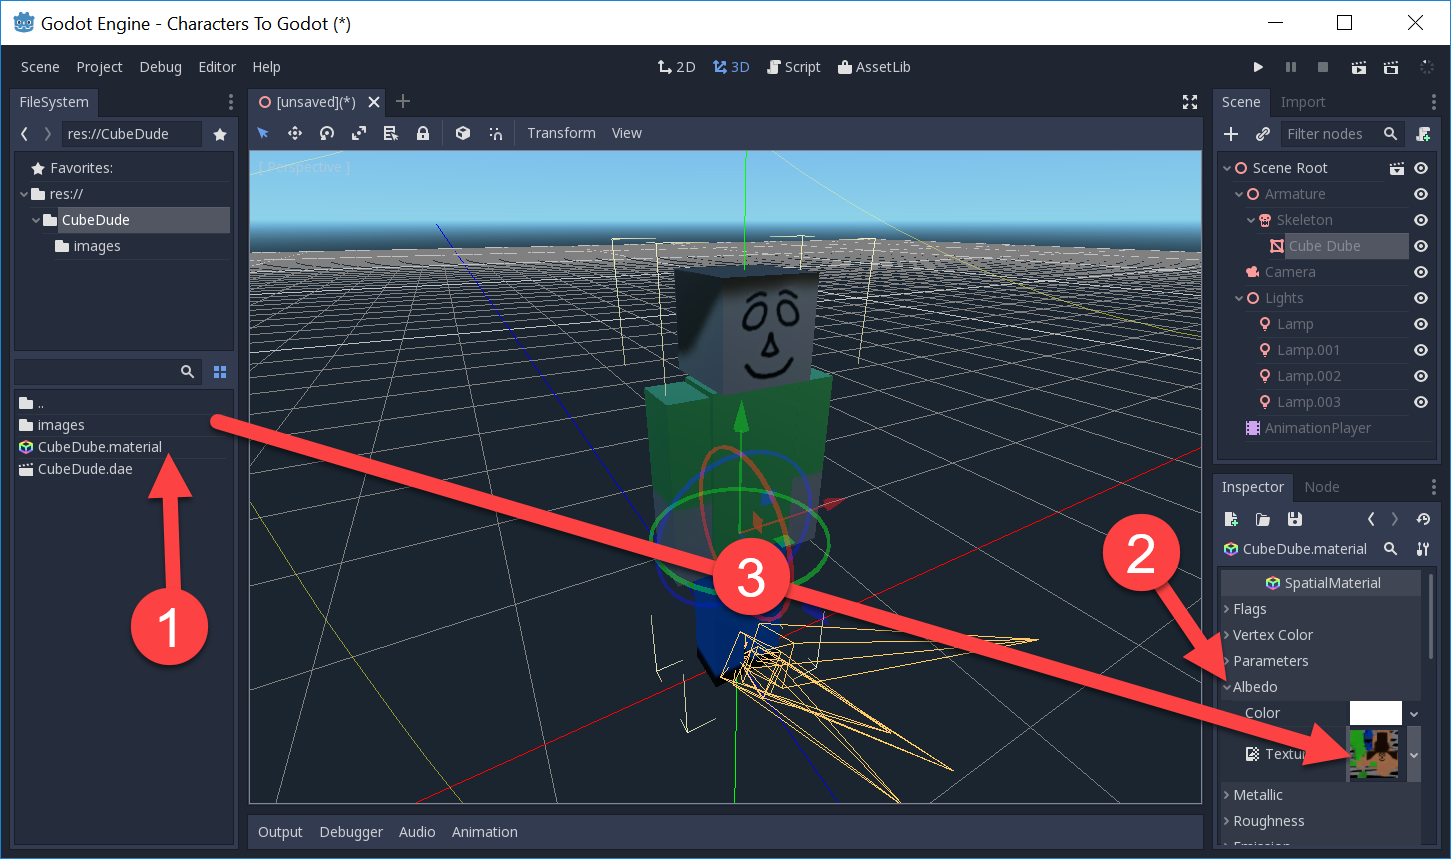
Voilà! Our material is reconstructed in Godot.
In this instance, it was pretty straight forward since our model has one material and one image texture to assign. A more complex model would repeat these steps until the model was reconstructed.
Note that you can reconstruct the materials first and then assign it to a mesh instance, the order doesn’t matter.
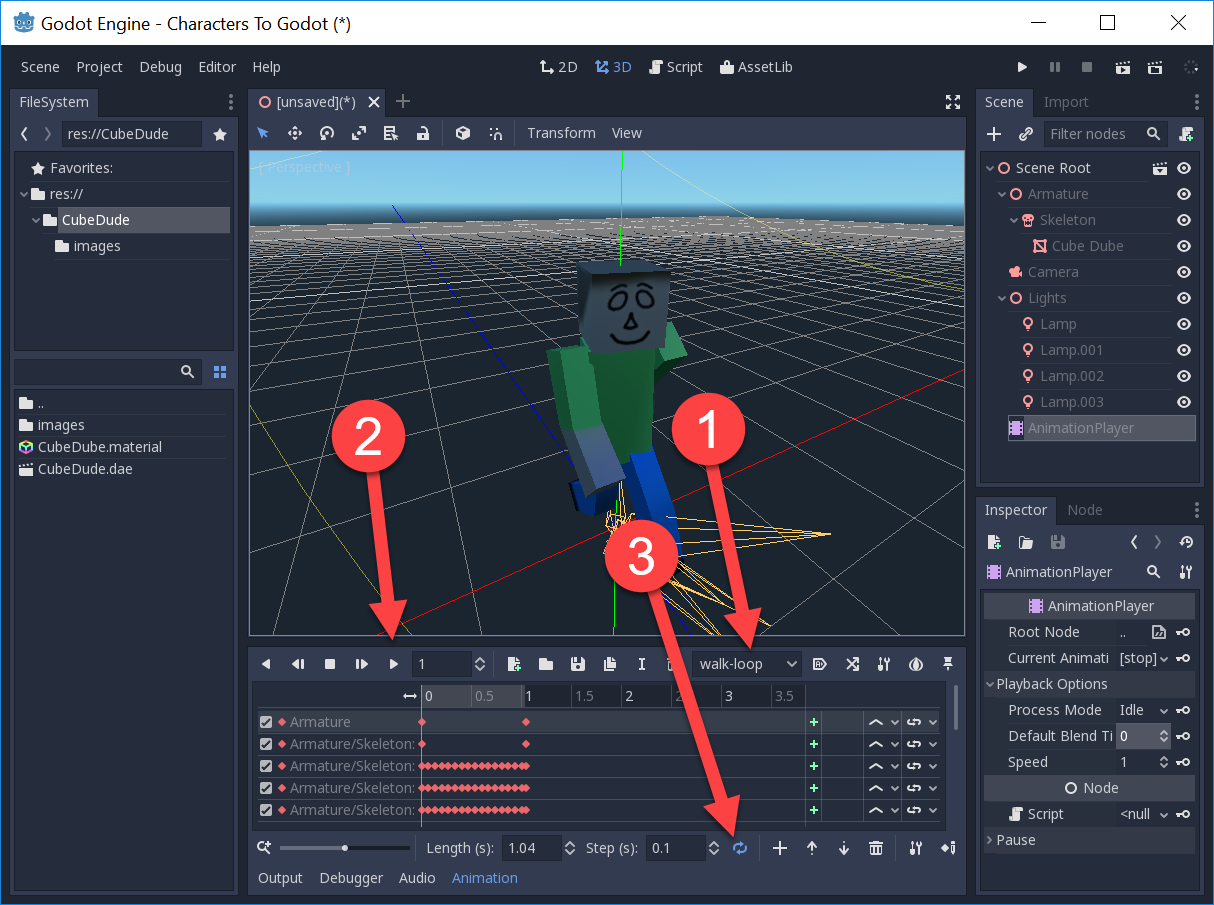
What about the animation and actions?
- Click on the Animation Player in the Scene tab
- You will see the animation data, and you can see the actions that were defined in Blender are present in Godot as well.
Notice that one of our actions has a “-loop” suffix, we will get back to that in a moment.

The basic controls are as follows:
- Select the action you wish to play
- Click play
- Turn on looping to see the animation loop. Action with a “-loop” suffix will automatically have this turned on.
Right, we are almost there. Let’s play our scene and because lighting and the camera came across as well we just need to click the play button in the top right or hit F5.

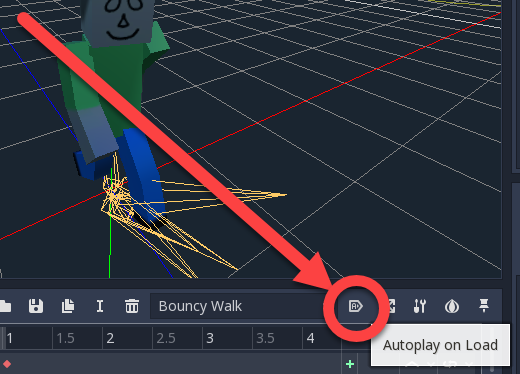
But our character just stood there still, and that’s because we haven’t set the animation to Autoplay On Load.
If you play around you will also notice that the “-loop” suffix on the action does one final thing. It will loop that animation in the game as well, whereas the other actions will play once. These would have to be looped in code, whilst those actions with the “-loop” suffix will automagically work.
Just look at him strutting in his new Godot home! Awesome!
If you are interested in learning more about Godot, check out our Kickstarter: Discovering Godot: Learn To Code By Making Games