
As we announced a few months ago, Godot is participating again in the Google Summer of Code program for its 2020 edition.
We selected 6 projects back in May, and the 6 students and their mentors have now been working on their projects for almost two months. We omitted to announce the projects formally (sorry about that!), but this first progress report written by each student will make up for it by giving a direct glimpse into their work.
Here are the 6 projects/students with links to the relevant sections in this post:
- Custom performance monitors and custom profilers by Utkarsh (simpuid)
- GDScript documentation generation system by Thakee Nathees (ThakeeNathees)
- Inverse Kinematics additions and extensions by Noah Beard (TwistedTwigleg)
- Improving Godot’s internationalization support by Jia Jun Chai (SkyLucilfer)
- Version Control Systems improvements by Meru Patel (janglee123)
- VisualScript improvements by Swarnim Arun (swarnimarun)
They’ve all been doing outstanding work so far, and we’re looking forward to integrating all those changes in the engine (some parts have already been merged in master branch for Godot 4.0).
Custom performance monitors and custom profilers
- Project: Custom performance monitors and custom profilers
- Student: Utkarsh (simpuid)
- Mentors: Fabio Alessandrelli (Faless) and Max Hilbrunner (mhilbrunner)
- Branches: Custom Monitors and Custom Profilers
- PR: Custom Monitors (merged) and Custom Profilers
Introduction
Performance monitors are used to measure various parameters like frame rate, physics time, draw call, etc. But they are limited to a bunch of predefined parameters. With custom monitors users can monitor a user-defined parameter together with the predefined ones. The only difference is that they appear inside the editor after running the game.
Godot has various pre-defined profilers: Profiler, Visual Profiler, Network Profiler, and Performance Profiler (in 4.0). They use a messaging system to communicate between the editor and the running game. Custom profilers exposes that system to GDScript so users can add their profiler in the form of a plugin. If you want to profile something that can’t be done using a custom monitor, you can make a custom profiler for it.
Current progress
Implementation of the custom monitor is complete and merged to the master branch (GH-39302). You can check that out now otherwise continue reading.
Custom monitors can be added/removed/checked using the Performance class. You register a Callable as one of the monitors. The game calls that callable at each profiler tick (performance profiler’s tick in this case) and sends the returned data to the editor together with the data of predefined monitors. You can find some example code in the PR and check the docs of the Performance class (not updated at the time of writing).
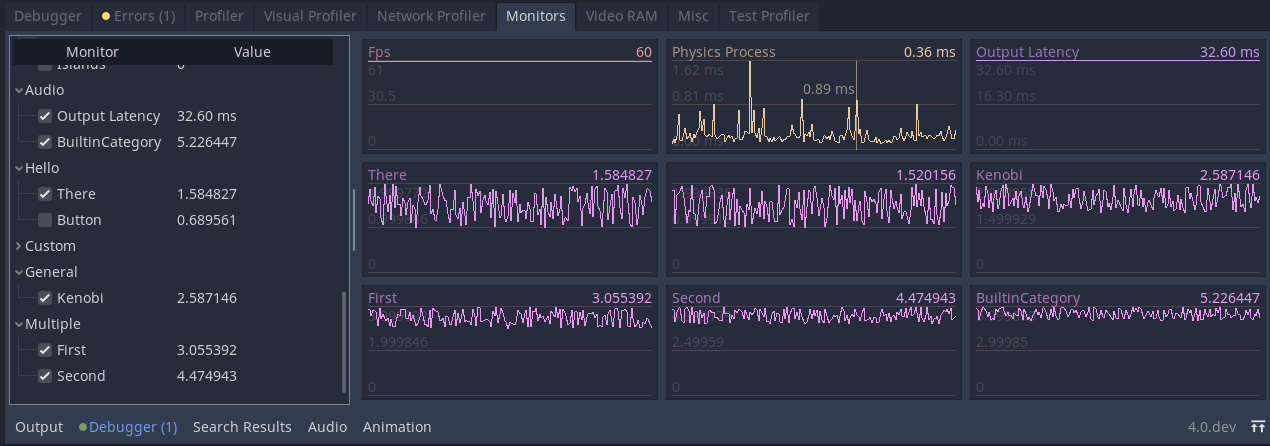
You can assign a category to custom monitors and organize them, and you can also read the previous values in the monitor graph by clicking LMB on them (suggested by samdze).
Implementation of custom profilers is complete but not merged yet (GH-39440, things are working so far). It is an API to expose the messaging system used by profilers in Godot so it involves multiple classes. There is EditorDebuggerNode which handles the task of instancing and removing the GUI scenes of custom profilers in the editor. ScriptEditorDebugger to handle the editor side of the custom profiler. EngineDebugger manages the game side of the custom profiler.
Adding the GUI scene of the custom profiler may seem odd at first (because we are using a packed scene instead of a node instance). Godot can debug multiple instances of the game concurrently so we need multiple instances of the profiler. EditorDebuggerNode manages this task for you. That’s why we need a packed scene instead of a node instance.
Sending a message between the editor and the game is done in the send_message function, but receiving them is not that simple. You need to register a Callable to receive messages. ScriptEditorDebugger calls the callable when it receives a message. The same goes for EngineDebugger.
There is an example project to demonstrate the working of a custom profiler.
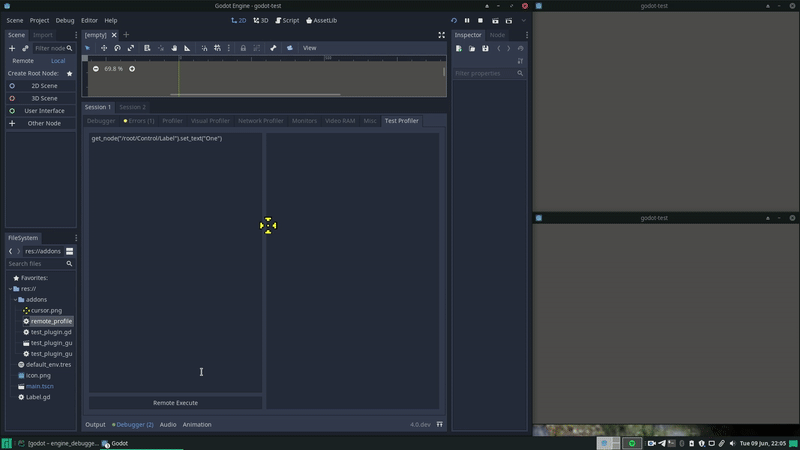
The yellow crosshair represents the mouse position relative to the game window. The “Remote Execute” button executes the text as an expression in the game. You can see the label change after remote execution.
What’s next
The custom profiler PR may need some refactors before the merge. Meanwhile, I shall implement/expose extra functions that would help in the implementation of the custom profilers.
After the merge, I can start working on moving the hard-coded parts of other profilers from ScriptEditorDebugger to their respective classes.
GDScript documentation generation system
- Project : GDScript documentation generation system
- Student : Thakee Nathees (ThakeeNathees)
- Mentors: George Marques (vnen) and Ankit Priyarup (ankitpriyarup)
- Branches:
- Core implementation: https://github.com/ThakeeNathees/godot/tree/GDSctipt-Documentation
- UI implementation: https://github.com/ThakeeNathees/godot/tree/GDScript-DocUI
About the project
One of the most requested language feature that GDScript lacks is being able to generate documentation for your code, using a system similar to “javadoc” in Java, “XML comments” in C# and “doc string” in Python, etc. The Godot in-engine documentation is very useful as we can browse and search the whole API offline, without leaving the editor. But this documentation is hardcoded in the editor binary, and users who make plugins and libraries don’t have any way to use that feature. In-editor documentation would be useful for their users to understand how to use their plugin/library, how to initialize it and what’s the cleanup process. So they either have to read the source code or to search help through the Internet.
My original proposal was to implement this with the new annotation system (which is added in Godot 4.0 with the new GDScript 2.0), but after discussing with the Godot devs and contributors (godot-proposals#993) the plan was changed to implement it with comments. A comment that starts with double hash symbol “##” is considered a doc comment and it should be immediately above the method/property it documents.
Here is a working example:
## A Math utility library for efficient matrix computations.
##
## @desc:
##     A utility math library implemented with SIMD feature
##     for efficient computations with complex matrices.
##
class_name Math

## The maximum value a GDScript integer can hold.
const INT_MAX = 0x7fffffffffffffff

## Adds two integers and returns the result.
## [color=yellow]Warning:[/color]
##     An integer overflow occurs when a + b > [member INT_MAX].
func add(a: int, b: int) -> int:
	return a + b
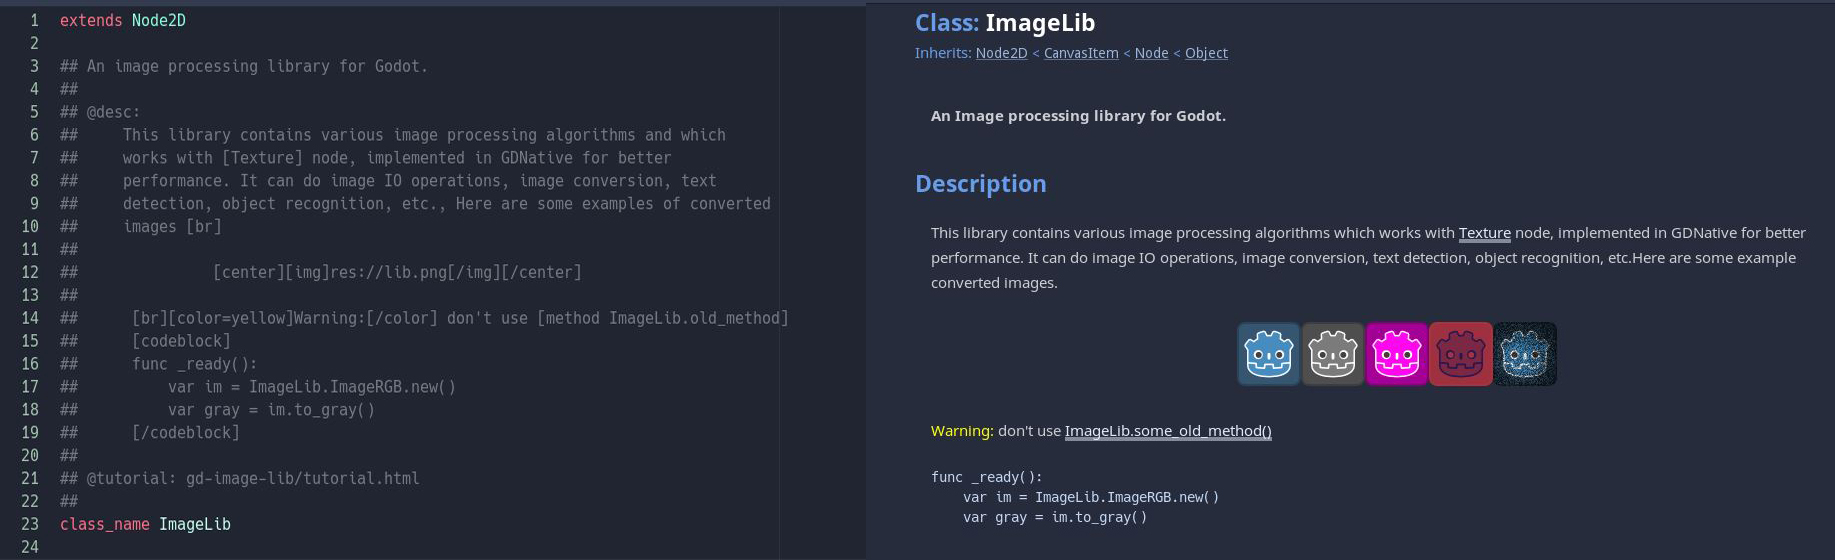
The documentation for the above piece of code will be generated as the script is being written, and automatically updated in the Help window. User scripts documentation can be found by their class_name if defined, otherwise the script’s path.
Overview and progress
The idea is that when the script compiles, we collect the description, brief_description, links, constants, etc. from the doc comments (comments that start with “##”) and map the comments to the field that they are documenting. All the relevant information (the name, data type, return type, setter, getter, default value, value of a constant, etc.) will be extracted from the parse tree and used to build a ClassDoc instance (like used for the Godot API) and update the editor help. It’s the core part of the project and it’s almost completed as of now. The other part of the project is the UI implementation. Visual Studio-like C# XML comment autocompletion support has also been implemented, and I’m currently focusing on generating an optional XML file for each documentation page, which could be exported to HTML by the user if needed.
What’s next
Currently the first part of the project is almost done and I’m working on the UI features. The following features are planned:
- Based on documented properties of a GDScript, the code editor can show a brief description when a property/method is hovered and a description when auto-completing for the property/method.
- The description of an exported variable could also be used as a tooltip in the Inspector
- An XML version of the documentation could also be generated for the plugin/library and it could be exported to HTML by the author for their website.
Inverse Kinematics additions and extensions
- Project: Add and enhance inverse kinematics (IK) in Godot
- Student: Noah Beard (TwistedTwigleg)
- Mentor: Joan Fons Sanchez (JFonS)
- Branches:
- 3D IK working branch: https://github.com/TwistedTwigleg/godot/tree/GSOC_2020_Working_Branch_IK
- 2D IK working branch: https://github.com/TwistedTwigleg/godot/tree/GSOC_2020_Working_Branch_2D_IK
Introduction and project overview
Hi everyone! My name is Noah Beard, and over the past several weeks, I have been working on improving inverse kinematics (IK) support in Godot. The Google Summer of Code so far has been a really productive and enjoyable experience, and I am excited to explain a bit of what I’ve been doing.
Inverse kinematics is a term to describe a system that positions one or more bones in a skeleton using an algorithm. IK can be used to adjust already made animations, add secondary or complementary motion to existing animations, or even to make completely procedurally animated characters. Because the motions that IK creates is completely done in real-time, animations created via IK can be changed at any time.
One of the most common uses for IK in 3D is to place a character’s feet on uneven ground without clipping through the geometry, where the legs realistically adjust to the terrain. IK can also be used in VR with VR controllers, allowing for the creation of arms that follow the VR controllers. Finally, in 2D, IK can be used with bone-based characters, allowing for everything from animating arms and legs, to rotating the head to look at a target. The possibilities with IK are numerous, and as such, I am excited to have the opportunity to be working on providing powerful and flexible IK options to Godot.
Current progress
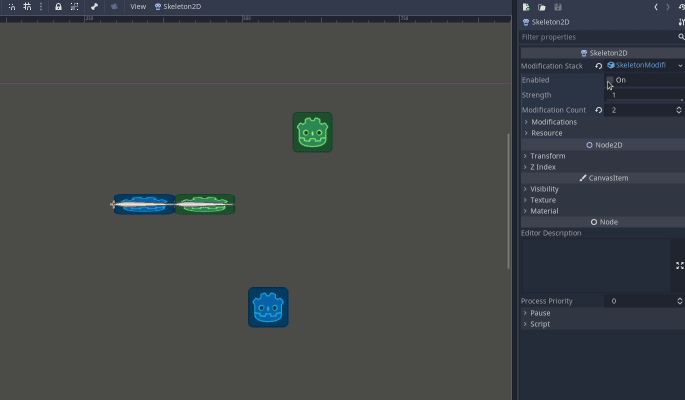
To handle the new IK changes in Godot, two new Resources have been created: SkeletonModification3D and SkeletonModification2D. These modifications are where all of the IK code resides and is where you can configure the various settings for IK. These modifications are designed to be interchangeable and to be run in a series, which is important for things like full-body IK. The Resource class was chosen for this because it allows for easily saving the modifications to a file if needed, allowing for easy reuse, for simple project control, and for its lower overhead when compared to a full node.
The following modifications are planned for both 2D and 3D:
- LookAt - Rotates a single bone to look at a given target. For 3D, the target is a Node3D/Spatial node, while for 2D the target is a Node2D based node. This modification has additional settings, like allowing for additional rotation to be applied and some simple constraints. An example use case for LookAt is moving a character’s head to look at something of interest or to look at the player.
- CCDIK - CCDIK rotates a chain of bones so that the given tip node/position is placed at the given target. Just like LookAt, the target can be a Node3D or Node2D node based on the dimension being used. CCDIK fully supports angle constraints in both 2D and 3D. In 3D, CCDIK rotates bones on a single axis, and rotation on this axis can be constrained. An example use case for CCDIK is moving a robotic appendage to a target position, like robotic legs that react to the environment.
- FABRIK - FABRIK also rotates a chain of bones so the end of the last bone is at the given target. Unlike CCDIK, FABRIK allows for rotation on more than a single axis per bone, giving more natural looking results for organic characters. FABRIK is also what is internally used with SkeletonIK, so if you are used to SkeletonIK, you are going to feel right at home with FABRIK. FABRIK does not support angle constraints, though it does support magnet positions, one per joint, allowing you to have a measure of control over how the bones in the chain will bend. There are also options to limit how many times FABRIK will execute per solve, and the threshold distance the chain needs to reach the target. An example use case for FABRIK is moving the arms and legs of a humanoid character.
- Jiggle - Jiggle rotates a single bone to face a given target. What makes Jiggle different is that it tracks its velocity when rotating the bone, allowing it to overshoot the target. There are options to configure how this velocity is calculated and applied, allowing for everything from stiff, spring-like motions, to soft, cloth-like motions. Jiggle is great for adding complementary, motion-based animations to your characters. An example use case for Jiggle is adding motion to long strands of hair or to the edges of clothing.
- TwoBoneIK - TwoBoneIK rotates two bones so they reach the given target. TwoBoneIK is less complicated to solve than something like FABRIK, allowing for better performance when you only need to operate on two bones. TwoBoneIK has several settings that configure how the modifier solves, one of the most important being the ability to use a node as a pole vector. This allows you to control the direction the TwoBoneIK modification will bend inwards when the target is within reach, which is important for joints like elbows and knees. As such, an example use case for TwoBoneIK is arms and legs for humanoids composed of two bones.
These modifications are named according to their dimension. For example, the LookAt modification in 3D is called SkeletonModification3DLookAt, while it is called SkeletonModification2DLookAt for 2D. Admittedly, it is a bit on the wordy side, but I figure it’s best to be precise. The modifications function in much the same way whether you are using them in 2D or 3D, though depending on the modification and the dimension, there may be more or less settings and features.
These modifications are managed by another Resource, called SkeletonModificationStack3D or SkeletonModificationStack2D, depending on the dimension being used. This Resource holds a list of all of the modifications being applied to a Skeleton3D, in addition to holding the strength of the interpolation for said modifications. This resource is extremely important for two reasons: The first is that it allows for easily saving all of the modifications in a single file. This is important for imported scenes, as by saving it to a file, you can easily reimport the file without having to setup all the modifications again. It is also important because it holds the order that modifications are executed in. This is extremely important for full-body IK setups, as you need to execute modifications in the correct order so the modifications react according to the results of previous modifications. For example, you want to have a modification that executes on the spine go before the modifications that operate on the arms and head, as otherwise the arms and head will solve without taking the new position of the spine into account. Both the Skeleton3D and Skeleton2D classes can hold a reference to a single SkeletonModificationStack.
So, what has been implemented? Well, both the 3D and 2D sides have the SkeletonModificationStack and SkeletonModification classes for their respective dimensions implemented. Additionally, the groundwork required to allow these modifications to run and work has been completed as well, like changes in the Skeleton3D and Skeleton2D class, for example.
On the 3D side, all of the above modifications have had their base implementation finished. Below is a tweet showing a 3D character using a LookAt modifier for the head, FABRIK for the spine, Jiggle for the hair (hard to see though) and TwoBoneIK for the arms:
https://twitter.com/TwistedTwigleg/status/1281991684771975168
Here’s a tweet from iFire, which better shows the Jiggle modification in action:
https://twitter.com/iFiery/status/1282823161927495680
On the 2D side, LookAt, CCDIK, and FABRIK all have their base implementation finished. The 2D work has only recently started, but it is progressing really nicely. Here’s a GIF showing LookAt in action:
As you can see, it is working well and even supports constraints! In case anyone is wondering: The reason the green joint snaps its rotation to a single bound is because of the angle constraint clamping code. I am still attempting to create an angle clamping solution that doesn’t exhibit these issues.
Other changes include adding a new local_pose_override function to both Skeleton3D and Skeleton2D, adding a rotate_to_align function in Basis, a looking_at function in Transform2D, having Bone2D nodes autocalculate their length and bone angle when possible, and more!
Next steps
While lots has been already done, there is still a lot left to do! Here is a list showing just some of the work that still needs doing. The list is in no particular order, and is subject to change as the coding period progresses:
- TwoBoneIK and Jiggle modifications still need to be implemented in 2D.
- The angle clamping code in 2D needs to be rewritten to avoid the joints “snapping” into just the min or max bound when the angle is out or range. It should instead snap to the closest bound, whether that be min or max.
- Additionally, options for easing this transition should probably be added.
- A few of the 3D modifications have bugs that stop them from working with new setups, and this definitely needs fixing.
- I plan to get to this as soon as I have finished the majority of the 2D work! It should just be something in the setup code, not the algorithm itself.
- Gizmos still need to be added for all of the modifications.
- Likely just basic ones that show the settings of the modifications in a visual way for now, due to time constraints.
- I want to look into changing how the PhysicalBone3D node works. The PhysicalBone3D node could probably either be made into a SkeletonModification3D or made to work with a SkeletonModification3D, decoupling its code from the Skeleton3D node. At the very least, the PhysicalBone3D node could likely benefit from the changes already made to the Skeleton3D node.
- The BoneAttachment3D node should probably be refactored to take advantage of the changes and potentially decouple it logically (in code) from the Skeleton3D node.
- Potentially look at adding some form of collision detection to the Jiggle modifiers, in both 2D and 3D.
- Finally, both the 2D and 3D work still has bugs that need to be ironed out, and documentation needs to be written explaining the changes.
Everything is coming along nicely so far. I am excited to continue to work on bringing these changes to life and get them into Godot so everyone can utilize them in their projects. It has been awesome working with Joan and the rest of the Godot developers, and I am looking forward to the rest of the Google Summer of Code. I have been amazed countless times by the Godot community, and I cannot wait to see how developers will utilize Godot 4.0 to make even more amazing projects!
If you want to follow my work, you can find me on Twitter here: @TwistedTwigleg. You can also find me on the Godot Community Forums, which I run and help administrate.
Improving Godot’s internationalization support
- Project: Improving Godot’s internationalization support
- Student: Jia Jun Chai (SkyLucilfer)
- Mentor: Rémi Verschelde (Akien), Michael Alexander (Yeldham), George Marques (vnen)
- PRs:
Introduction
Localization is part of game development if one wishes to make their games more accessible to a wider audience. The process of localization involves text translation, audio translation and even cultural adjustment for specific regions.
This GSoC project aims at improving Godot’s support for text translation. In Godot, we have two ways of importing translation - by using CSV or PO files. CSV is simple to understand and use. It provides one to one translation for a string key, i.e. for a given sentence there is one translation that maps to the sentence. PO files are a bit more complicated to understand, but they can handle translation involving plurals and context. Translation involving plurals can be tricky because different languages have different plural rules. PO files are capable of encoding this information.
During this GSoC period, I have been able to implement two features so far. Both of the features aim to improve Godot’s support for PO files.
POT generation
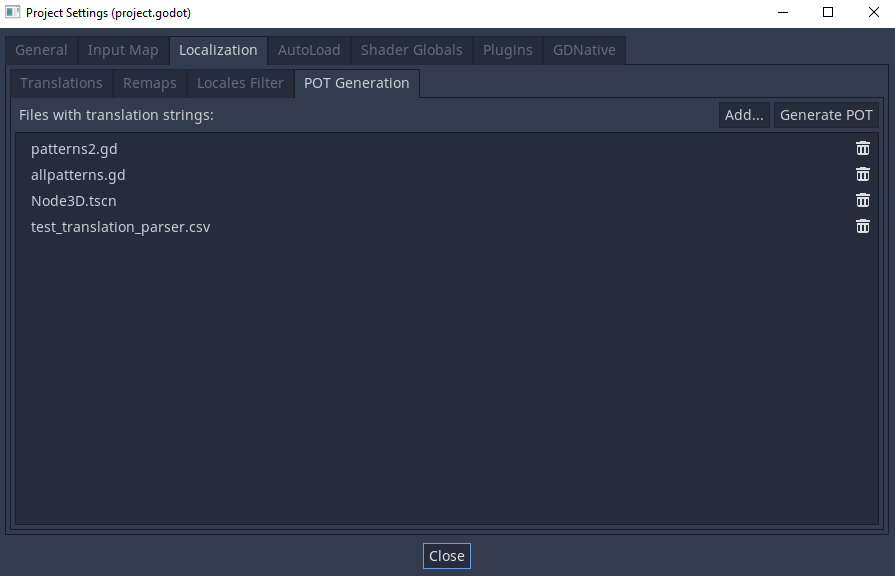
POT files are templates for PO files. When we have a POT file, we can convert it to PO files of different languages, for example fr.po, ru.po, etc. using a PO editor or gettext tools.
Users can now generate POT files through Godot’s editor. This feature can be found under the “Project Settings” tab. Users can include the files that contain translatable strings, click “Generate POT”, and the translatable strings in the files will be extracted and written into a POT file. Godot translates a lot of properties automatically which can be set in scenes and scripts, and the POT generated is able to extract all the most common property values set in the inspector or your scripts to add them to the POT, as well as manually translated strings via the tr() method.
Furthermore, a plugin system is implemented which allows users to define their custom parsers to extract the translatable strings. With this, users can write their own parsers to extend the POT generation system to handle files with different formats.
To find out more, check the pull request for this feature: GH-39415.
Plurals and context support
Plurals and context support has been one of the features that is missing from Godot’s internationalization system. Users can now use the newly added APIs for translating plurals and providing context in a translation. This new feature will resolve issues such as GH-31432 and GH-13267. The added APIs are:
- For project scripts:
tr_n(message, plural_message, n, context = "")
- For the editor:
TTRN(message, plural_message, n, context = "")DTRN(message, plural_message, n, context = "")RTRN(message, plural_message, n, context = "")
- All existing translation functions can now add context with the last argument too:
tr(message, context = "")TTR(message, context = "")
To find out more, check the pull request for this feature: GH-49443.
Version Control Systems improvements
- Project: Improvements of the Version Control System integration in the editor, and the first-party Git plugin
- Student: Meru Patel (janglee123)
- Mentors: Gilles Roudière (groud) and Twarit Waikar (IronicallySerious)
- Branches:
Introduction
Godot 3.2 introduced initial version control system (VCS) support, which was developed during GSoC 2019 by Twarit Waikar. It introduced an in-editor GUI, a plugin interface and a first-party Git integration plugin. The interface provides API points to communicate with the in-editor GUI. Any version control framework can be implemented on top of the interface API. This project aims to improve the compatibility, usability and reliability of the VCS support of Godot, and the godot-git-plugin.
What’s new?
The initial GSoC 2019 project had been an excellent effort. However, there were many things to improve. It provided staging, unstaging, committing and display of the diff of unstaged changes. This GSoC project adds new essential features which were not available. The goal is to cover all basic VCS operations so that you don’t have to leave the editor. There are also lots of bug fixes and stability enhancements.
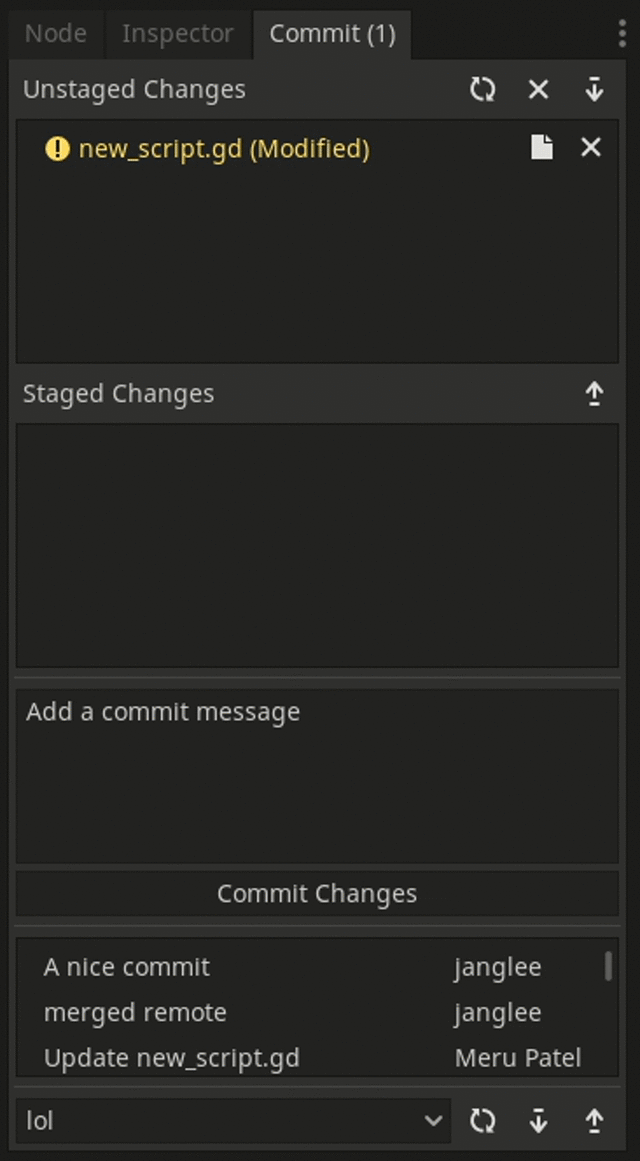
A new UI for the commit dock with new Git operations
The new commit dock has been designed from scratch. The previous commit dock was a little bit confusing. The new dock has a comprehensive list of both staged and unstaged changes. You can stage/unstage a single change or all changes with one button. This also comes with UI buttons to open or discard changes from a list. At the bottom of the commit dock, a new list of previous commits has been added. It includes the last few commits with the author names.
Remote and branch support
Remote support was the most requested feature from users. I am very excited to announce that the new version will come with pull, push and fetch operations. Now you can perform any of these operations inside the editor with a single click. You have to provide credentials in the set up dialog box to work with the remote. In order to support private repositories, pull and fetch also require credentials. For now, the origin remote is hardcoded so it only can connect with origin. You can use a GitHub ID and password to connect with remote repositories on GitHub. Another small but important feature added is the branch checkout. You can checkout a branch from the list of local branches.
Diff view
A new diff view replaces the old traditional command-line output with a comparative list. This is a work in progress and close to completion. It provides two split and unified views of the diff. You can see the diff of stage/unstaged files or a full commit change from the list of previous commits.
How it looks
Here is the new UI of the Commit dock. It is inspired from Atom’s GitHub package.
Coming up next
The next planned feature is gutter indicators in the script editor for line changes. I am also considering restructuring the plugin in order to make it an add-on and upload it to the Asset Library. This will make the installation process quick and simple instead of having to download it manually.
VisualScript improvements
- Project: VisualScript improvements
- Student: Swarnim Arun (swarnimarun)
- Mentors: Ernest Lee (iFire and Anish Bhobe (KidRigger)
- Branches:
Introduction
There are a lot of different small things that I have worked on this summer for the project, but let’s keep it short and categorize them in two main blocks as I did in my proposal. The essence of this work is to make the VisualScripts better in ease of use and accessibility.
VisualScript refactoring
VisualScript had been incurring a lot of technical debt from my work last year and other things that have been done to improve it. While there’s still more to do, most of the heavy refactoring has been done and we even ended up with a small feature enhancement. We should have time this Summer to move on to the next task (discussed later).
Without getting into the technical details, I redid parts to remove extras and hacks that had been used before, and to try to make it easier for future changes.
As for the small feature enhancement produced from it, it is the ability to use nodes from multiple functions, thus removing the need for duplication of code.
Submodules, groups or macros
As you can already see I am on the fence about the naming, I think a better name might be deserved so suggestions are welcome.
This is the main objective of this Summer and can involve a lot of different features, but the primary features that it deals with are being able to have function-like blocks of VisualScript code that allow us to reuse them without restricting them to functions from the Godot system itself.
The feature is currently made of GUI parts and internal data classes that will hold the VisualScript code, but allow us to detach them from the VisualScripts themselves and have a well-defined API to reuse them in multiple VisualScripts. This would be a bit similar to saved node groups/modules in Blender.
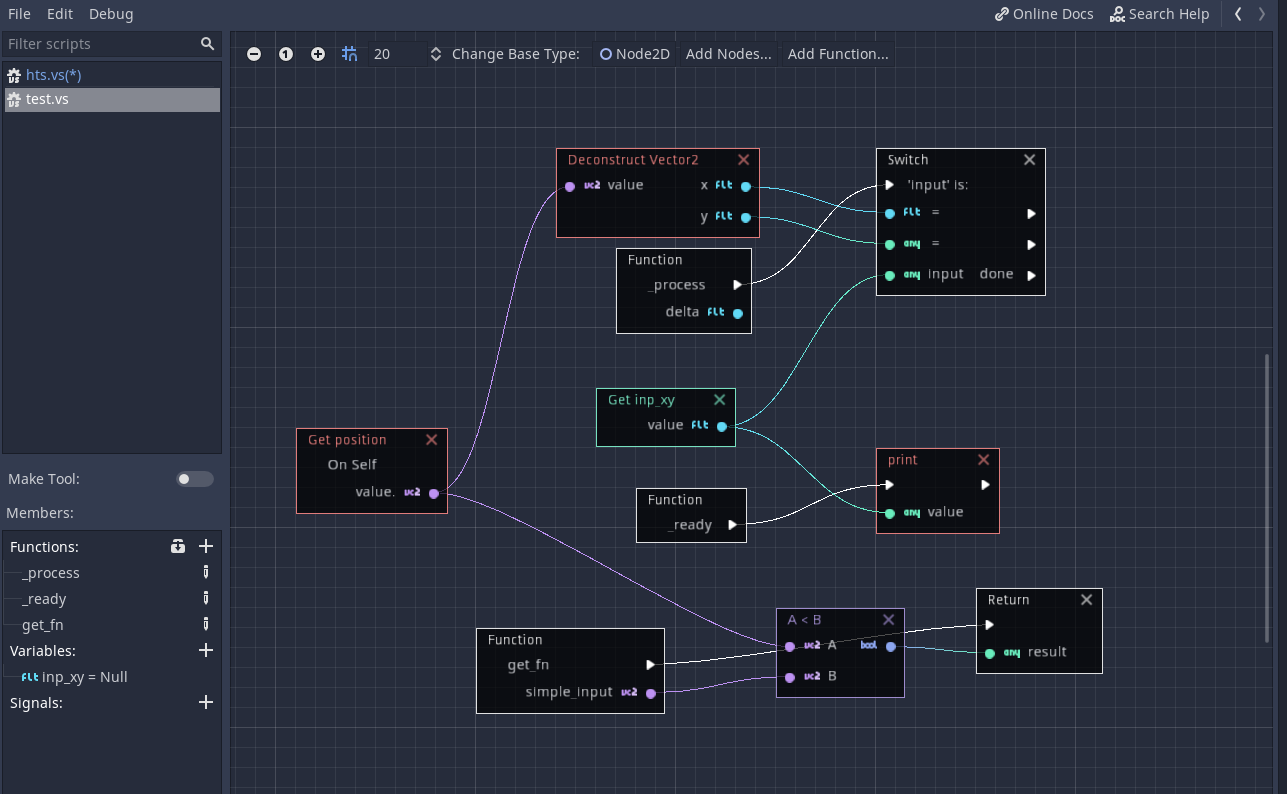
The feature is lacking both finish and feature completeness but here’s a preview anyways:
Note
This was a small progress update but I am thinking about more research and feedback-driven development as soon as I draft a working PR for submodules.
I will be keeping everyone posted on my blog (swarnimarun.github.io), in a weekly or bi-weekly manner outside of Godot’s official progress reports, and will ask for feedback in comments or forms. I will be sharing some testing builds if anyone is interested in a bug hunting trip… ;)
Extra
Other than that I will try to look at ways to improve the parts of Godot I worked on (depending on the free time I have), once everything is done this summer. Like the Theme editor, and adding submodules to Visual Shaders, so please feel free to suggest stuff that you think could help with anything you are having issues with.
That’s it for this progress report! You’ll hear more about each project as we draw closer to the end of the GSoC 2020 coding period.
A big thankyou to all students for their quality work and creative ideas to implement or improve those features in Godot, and thanks to all the mentors who support them!