Godot uses a considerably different approach to rendering (and rendering abstraction) than other, popular, game engines. The motivation behind it was not to achieve the maximum performance in extreme use cases, but accomodate better to most user’s needs.
This document was written in hopes to find more developers that would like to help us write rendering code, as it explains the overall design. Without it it’s quite difficult to get into the internals. Rendering engineers are rare to find, so this can be a starting point. If you are not an existing or aspiring rendering engineer and you still want to help, please donate to our Patreon :) so we can eventually hire intern work for this.
Please also ask for anything that might still be unclear to be explained further if needed. As always, feedback is very welcome as this is an open project.
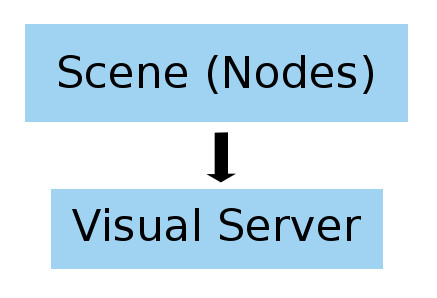
Visual Server
As mentioned in other articles, the whole rendering process of Godot happens in a server. The server completely abstracts the rendering internals and provides access handles to creating and manipulating objects via opaque IDs.
This design makes some things easy:
- Avoiding user and developer mistakes by forcing a very clear API wall.
- Running the whole graphics rendering in a separate thread.
- Ability to completely reimplement all rendering code if desired, without changing the underlying game. Even using different techniques such as path tracing can be easily accomodated due to the high level of abstraction.
Of course it also has drawbacks:
- Sending commands via a lock-free FIFO to rendering thread is cheap, but still has a higher penalty.
- It is not possible to control, from user code, the internal steps of rendering. This may change in the future, though.
- Retrieving data from VisualServer is slow, as it may need synchronization. Thankfully this is rarely necessary.
In any case, the advantages outweight the drawbacks for our use case.
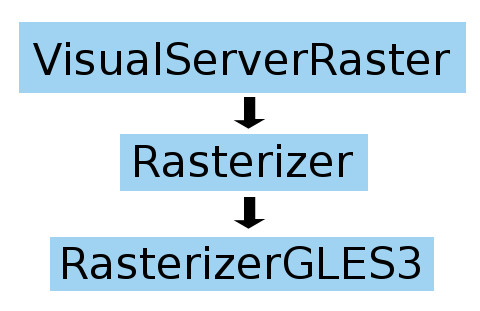
The default VisualServer implementation in Godot is VisualServerRaster, which is a Visual Server designed for rastering. This implementation handles spatial indexing of objects and, every frame, building a render list of objects drawn. It also handles the pairing of objects (lights to geometry, GI to geometry and lights, etc.).
Rastering is done via another opaque interface, Rasterizer, which, in Godot 3.0, was further optimized to take batches of objects instead of having to call one by one to render (which hurts performance).
Rasterizer abstraction
Godot’s rasterizer implementation is also considerably high level. We know it would probably be easier to just abstract a low level drawing API like OpenGL or Direct3D (or use open APIs, such as BGFX). However, this makes our work more complex in the long run.
The reason for this is that, when supporting multiple backends, different techniques may also need to be supported. For example:
- On GLES3+ we can use UBOs to optimize shader parameters. On GLES2, regular uniforms are used.
- On GLES3+ we can use VAOs to optimize array configuration. On GLES2 regular
glVertexAttribPointermust be used. - On GLES3+, we can use cool rendering techniques like Clustered or Single Pass Forward. On GLES2, for peformance, only multipass forward makes much sense.
- On GLES3+ we can use transform feedback for particles or blend shapes, while on GLES2 everything needs to be done using CPU.
- And the list goes on.
Given GLES2 isn’t going to disappear any time soon due to low end mobile devices, we still need to support it for a few more years to come. In the future, this might be the same case with newer rendering technologies. Godot’s high level abstraction of rastering allows us to focus on using the rendering techniques that best fit each technology.
Rasterizer design
Godot uses OpenGL ES 3.0 for high-end rendering (and OpenGL 3.3 on PC). This ensures great compatibility with all desktop PCs, mobile devices and WebGL 2. This may seem like we are restricting ourselves on purpose but, truth is, OpenGL ES 3.0 is already a very good and modern API. We can also access newer GL features via extensions, so we don’t miss much.
Wait, why not Vulkan or DirectX12?
We often are asked questions about why Vulkan or DirectX12 are not used instead. Truth is, the main advantage of using them is the ability to build render command lists using multiple CPU cores. This allows to render hundreds of thousands of objects at lower cost for the CPU. As great as this is, though, only very high-end and high-budget games will really make use of it.
The reasons may not seem that obvious, but:
- OpenGL3+ can already render millions of objects at little cost using hardware instancing if they are similar.
- If you have hundreds of thousands of different objects, and they don’t move, they can be batched.
At the end of the day, the use case where Vulkan and DirectX12 make the most sense is when you have hundreds of thousands of objects, which are all different (different geometry, textures, etc.), and which move. This is a difficult use case to achieve, even willingly.
Added to that fact, Vulkan still has years to go until it’s properly supported in most desktop and mobile platforms, which makes it unattractive to implement for us (as it means considerably more effort to write, debug and maintain). As for DirectX12, it’s only relevant for Windows/UWP, so there is no strong incentive for us to support it as a cross-platform engine.
I’m not trying to say that these APIs are useless, though. They allow very high-budget games to run better and, in the long run, make the job of writing drivers MUCH simpler to hardware manufacturers. They are simply not good enough for our use case.
Shader abstraction
Most game engines nowadays start with HLSL or CG as a base and offer it to the user directly. This may sound like the obvious way of doing things but, in truth, it creates a big bottleneck on allowing users to write shaders.
This is because:
- Users have to learn a complex shading language.
- That language is not fully taken advantage of, because code must be fitted along the engine’s internal shaders.
- Users need to learn not only the language, but how the engine internals work regarding shaders.
- A very harcoded way of passing user data to shaders is often used.
The advantage may be that users can freely modify the full engine shaders, but at the end of the day this modification ability is limited to not breaking how the engine interacts with them. To make matters worse, it just excludes a huge amount of users from writing their own shaders due to the high complexity in this process.
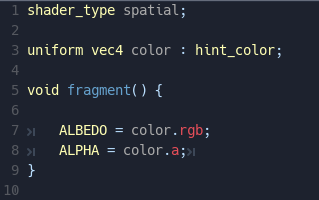
In Godot, we took a different route: we wrote our own shader compiler that is mostly based on GLSL ES 3.0 (in only 4k lines of code!) and restricts the environment only to the engine internals. We also made the syntax for interacting with Godot (exposing parameters) really simple.
Added to that, several elements make shaders in Godot easy and a joy to write:
- Built-in editor with syntax highlighting.
- Full code completion.
- Descriptive error reporting (not just generic errors on a given line like in other popular game engines..).
- Ability to bundle shaders inside materials.
- Ability to convert a Spatial Shader (or Shader Graph) to code in a single click, to customize it or learn how it works.
Shaders are, then, translated to native language (real GLSL) and fitted inside the engine’s main shader.
This approach also has several more advantages. Given the high control we have over the shader compiler, we can:
- Detect when shaders write to the alpha channel and automatically make the surface go via the transparent pipeline.
- Detect when shaders read from screen texture and automatically copy screen to back-buffer on demand.
- Detect when shaders use TIME and automatically force screen refresh (in Godot, you don’t need to set the screen to update constantly to debug animated shaders, this happens automatically).
- Automatically switch to vertex lighting if needed, with no need to rewrite the shader.
- Detect when shaders modify a vertex offset or use “discard”. If none of this happens, we can use a generic opaque material for depth prepass or shadow passes. This reduces state changes hugely and speeds up depth rendering.
And all the above happens transparently to the user! With Godot 3, we expect far more users will be writing shader code in proportion to other game engines given how easy it is.
Rendering design
For Godot 3, after long discussions, we decided that we won’t use a deferred renderer. Forward rendering-based optimizations for high amount of lights are now mature and well tested in production. This also makes Godot depart from the way that popular game engines set to follow many years ago.
The most obvious advantages of leaving deferred rendering are:
- Much simpler renderer design.
- Simple rendering pass (with very optimal depth prepass, thanks to our own shader language).
- Great alpha blending support.
- Support for MSAA, no more hacks to get nice antialiasing.
- Less memory bandwidth wasted.
Then there are also less obvious advantages, but which are high priority for us:
- Almost full Principled BSDF support: in Godot, you get Anisotropy, Rim, Subsurface Scatter, Clearcoat, Transmittance, and plenty more of modern rendering parameters for free, without switching them to a forward pass or sharing G-Buffer space like in other engines.
- Much better customization of lighting modes (pick one of free Lambert, Lambert Wrap, Toon, your own code, etc.).
- Unlimited reflection probe blending.
- Voxel Cone Tracing during single rendering pass.
- Full masking of objects: any light, probe, etc. can be masked with any object. This allows a lot of nice behaviors, such as indoor/outdoor lighting masking, per character lights, etc.
The main disadvantages are:
- A very high number of lights is still expensive, though it can be worked around using additive blending for very far/small ones.
- Custom light code, per light, is not possible.
- Light types are more limited.
On temporal antialiasing
Temporal antialiasing (TAA) exists mostly as a solution to the deferred rendering problem and its inability to use multisample antialiasing (MSAA).
In Godot, MSAA is supported so this is not really a problem. Still, TAA has a few more advantages:
- Can use temporal reprojection to improve the quality of SSAO and SSR.
- It’s a bit cheaper than MSAA on bandwidth.
- Can help improve aliasing problems with reflections and normals.
- Cheap motion blur.
Unfortunately, it has drawbacks too:
- The whole rendering pipeline needs to keep track of previous frame transforms, including skeletons, blend shapes, solid particles, etc.
- Produces ghosting effects in many situations. Some players dislike this.
- Does not work for transparent objects.
- Does not work well with VR.
Balancing pros and cons, it’s probably not worth implementing it, but the door is open for it.
Framebuffer layout
Godot uses the following framebuffer layout:
For MSAA rendering:
| Depth | R | G | B | A |
|---|---|---|---|---|
| Half-float | Diffuse + ambient red | Diffuse + ambient green | Diffuse + ambient blue | Ambient scale |
| Half-float | Specular red | Specular green | Specular blue | Metallic |
| 8-bits | Normal X | Normal Y | Normal Z | Roughness |
| 8-bits | Subs. scatter | - | - | - |
Normally, only the first two buffers are rendered. The third is only used when Screen Space Reflections and SSAO are anbled. The fourth is used only for materials with subsurface scattering.
For effect processing:
- Half RGBA framebuffer (buffer itself)
- Half RGBA framebuffer with mipmaps (for blurred backbuffer, SSR blur and bloom stages)
- Two R8 framebuffers (for SSAO and resolving SS Scatter)
- RGB8 framebuffer (for resolving Normal + Roughness).
- Half RGBA luminance reduction buffers (3x3 reduction).
Rendering sequence
Godot efficiently adds or removes steps according to how rendering is configured, so the list presented below should be interpreted as “worst case scenario”. As you will probably notice, given effects are so harcoded into the rendering pipeline, they are extremely efficient. Godot with all the effects enabled runs nicely on low-end hardware.
1. Depth buffer pre-pass
The list of geometry to be rendered is evaluated once, and the opaque render list is filled once. As most geometry is just opaque, Godot optimizes by assigning the same material and shader for all objects that don’t use alpha scissor or write to VERTEX.
2. Light setup
All lights visible in a frame are configured and set up into UBO/TBO. Indices are assigned to each. In pure forward rendering, these indices are passed per object drawn. In clustered rendering, they are obtained via 3D texture + indices.
3. Opaque sort
Godot uses a 64-bits integer to identify drawing order. This integer mixes render priority, flags, material index, geometry index, and many other variables. When sorted, it minimizes state changes in the render pass.
4. Opaque render pass
Opaque objects are rendered in a way where state changes (and calls to OpenGL) are minimized. In this pass, the MSAA buffers are used.
5. Sky rendering
If a panorama sky is present, it’s rendered in this step.
6. Perform SSAO
The depth and normal buffers are resolved and set for reading. Godot processes full-screen SSAO, which is later saved to an R8 buffer, then ping-pong blurred using separable convolution.
Finally, the diffuse + ambient buffer is resolved, and ambient occlusion is applied based on the “ambient scale” component, which stores the ratio between diffuse and ambient light. On objects that provide their own baked AO, this value is harcoded to 0, to avoid SSAO from interfering with them. This allows beautiful mixing between baked and real-time.
Up to this point, keep in mind that only diffuse + ambient light has been resolved.
7. Perform Subsurface Scattering
A separable convolution is performed to blur the diffuse + ambient buffers, using the Subsurface Scattering buffer as reference of where this effect is applied. This effect looks correct in Godot, given it must only be applied to diffuse and ambient light.
Again, keep in mind that only diffuse + ambient light has been resolved here.
8. Perform Screen Space Reflection
Screen space reflection is performed at half-resolution and stored at a half-resolution buffer. Godot uses a very correct raymatching approach for this, using Bresenham to draw lines and not process redundant pixels. For roughness, a blurred version of the source scene is used. This approach is not correct, but it’s pretty fast.
Keep in mind that only diffuse lighting is used as source for SSR, otherwise specular blobs are wrongly reflected… which looks really bad.
Finally, the specular buffer is resolved and mixed with SSR depending on the metallic amount. This is not completely correct, as it can make some specular blobs lose strength, but in practice it looks fine.
9. Compositing
Both specular and diffuse are mixed back, obtaining the final image for opaque materials. If Godot detects that any shader reads from the screen, it will generate mipmaps and put this composition in the effect buffer, while applying gaussian blur to each step. This allows to read from the screen blurred, and works great for materials with fake rough refraction.
Finally, everything is also copied back into the diffuse + ambient buffer to continue rendering.
10. Transparent sort
Objects that were sent to the transparency render list are sorted by depth, from back to front. This rendering step happens on the diffuse + ambient MSAA buffer alone.
11. Transparent rendering
Finally, objects that use transparent materials are all rendered to the diffuse + ambient MSAA buffer. More state changes happen, so this is obviously a less efficient pass.
12. Resolve
The final image is again resolved into the effects buffer.
13. DOF blur, FAR
A two-pass separable convolution takes place to blur objects beyond a specific depth, with interpolation during the transition area.
13. DOF blur, NEAR
Again, a two-pass separable convolution takes place to blur objects closer to a specific depth, with interpolation during the transition area. The interesting part of this algorithm is that it is actually done in two passes, without any extra buffers… in a somewhat novel and unique way. The quality is not the best, but the difference is hardly noticeable and performance gains are big.
14. Exposure
The image is converted to luminance and shrunk by sizes of 3x3 until it’s a single pixel. For auto exposure, this value is used as interpolation target.
15. Bloom
The image in the effect buffer is also gaussian blurred using the mipmap buffers. Godot allows to exchange up to 8 mipmaps to go from thick outlines to broad blurred bloom. Mipmaps are also shown using bicubic upscaling for better (less blocky) quality.
16. Final compositing
In a single, final compositing stage, the following happens:
- Bloom stage application
- Exposure
- Tonemapping
- Linear->SRGB conversion
- Final adjustments (BCS, color correction, etc.)
And that’s it!

Material sequence
We have seen the general rendering workflow used in Godot 3. The next step is to detail the 3D material shader steps.
1. User code
First of all, user code runs, setting up all the parameters that will be used for shading.
2. Decals
As decals can change the material properties, they need to happen before anything else.
3. Sky contribution
Sky contribution consists of two accumulators: ambient and specular light. Specular light is read directly from the sky, but ambient can be configured to range from a constant color to the blurred version of the sky.
Godot stores sky textures as a texture array, with each reflection in an array slice. This method is preferred over storing blurred versions in mip-maps (which is used anyway on mobile) simply due to increased performance and much less aliasing.
On a texture, a dual paraboloid is used. Clever readers might point out that an equirectangular panorama is better. The problem is that, for a texture array, the discontinuity at the poles screw up the derivatives in the atan2() call. In any case, it does look good anyway.
4. Directional light
In Godot each directional light means a new whole scene render pass, so use those with care. It’s hard to need more than one anyway.
Godot uses regular cascaded shadow maps, with 4 cascades and optional blending between cascades. For performance, all cascades are stored in a single shadow texture.
All lights in Godot support contact shadow computation, to compensate potential bias problems. When using vertex lighting, only this shadow type is supported.
All lights also support transmittance (to use with subsurface scattering) if shadows are enabled, but this will force the object to perform reverse culling when rendering to a shadow.
5. GI probes
Godot uses voxel cone tracing (VCT) for global illumination (GI). It uses it in a way similar to reflection probes, so they must be configured over specific areas to work. As less resolution probes are used than in the original NVidia paper (to compensate and gain considerably more performance), this also compensates back in quality.
Probes can be set as interior or exterior. If set as exterior, they will blend with the sky for the remaining cone trace alpha. If not, the sky will be ignored.
Up to two GI probes can be blended for a specific object, but this actually works pretty nicely. It’s possible to have a large probe for a general area in low resolution and then smaller probes for specific places (e.g. a house).
6. Reflection probes
Up to any amount of reflection probes can be mixed per object. Godot uses a really nice automatic weighted blending algorithm for this. Like GI probes, reflection probes can be set as interior or exterior (to determine blending with sky), as well as have their own ambient lighting to better tweak artistic look.
When a reflection probe is used together with a GI probe, the reflection is overridden by the one from the reflection probe (but still weight-blended properly).
All reflections are read from a single atlas texture (though this will be moved to a texture array soon).
7. Omni and spot lights
After those, omni and spot lights are processed. All shadows are read from a single atlas texture.
8. Metallic + BRDF + energy conservation
Finally, diffuse and specular lights are weighted by their metallic parameter in order to ensure energy conservation.
Godot uses an approximation of the BRDF function in order to save a precious texture slot.
9. Fog
Fog is applied here instead of in a post-process. That’s another nice advantage of not using deferred.
Atlases
Godot uses atlases for most data read in the material shader in order to save on texture slots.
Omni & spot shadow atlas
Godot uses a dynamic shadow (omni and spot) atlas per viewport. It allocates and reallocates shadows in the atlas depending on the view distance. This atlas is persistent, meaning that if nothing forces the shadow to redraw (and assuming the shadow did not become too close or too far away), it is kept as is. This allows having a very large amount of shadows on-screen.
Shadows are stored as dual paraboloid (DP) for omni and normally for spot. Even though dual paraboloid is used, lights are previously rendered to a cubemap and then converted to avoid artifacts. This conversion is very quick, and has the huge advantage of optionally allowing DP to be rendered directly on some lights (e.g. smaller ones) for better performance.
The shadow atlas divides the shadow texture in 4 equal squares. Each square can be further subdivided to create more or less shadow maps. The default subdivision is:
- Quadrant 1: 1 big shadow.
- Quadrant 2: 4 smaller shadows.
- Quadrant 3: 16 small shadows each.
- Quadrant 4: 64 tiny shadows.
Users can configure this subdivision to fit less generic types of games, but the default works pretty well. Shadows will normally bounce between subdivisions depending on their distance to the camera. The effect is pretty much unnoticeable.
Directional shadow atlas
Directional shadow uses a single texture that is not kept between frames (although this might change in the future). If more than one directional light is used per scene, less space is available for each light.
Reflection atlas
Godot uses a simple reflection atlas supporting 64 reflections of equal size. Reflections can be computed on load, or on every frame (slower). Reflections are stored as dual paraboloid.
Decal & projector atlas
Decal images and projectors are stored into a single atlas. If images are too big to fit the atlas they will be shrunk and appear with less quality.
Closing words
For Godot, we aimed to have a really simple 3D renderer (all the above, shaders included, amount to only around 10k lines of code) that is powerful, yet very easy to maintain (we don’t have millions of dollars to pour into development, so we are forced to understand our priorities well).
If you are a render engineer, feel free to take any ideas you have read from here for your own renderers (in fact, feel free to take any code, as Godot is MIT licensed).
Thanks for reading, and any feedback is very welcome!